What? Model and animate our solar system in Maya. You must include all of the planets. Only the Earth needs a moon, you don't have to include a moon for the other planets. You do not need to use materials or textures (all the planets, sun, and moon can be the same default gray). The animation shouldn't be more than 20 seconds long. This is an "artful" interpretation of our solar system. Measurements do not need to be perfectly in proportion, in fact do not make the planets super tiny and distant in comparison to the sun, and try to keep everything clearly visible from one perspective.
When finished with your Solar System animation, you must render a "playblast" video (for instructions on how to do this see page 65 of the book Introducing Maya 2011). Angle the camera so we get a nice angled perspective (not looking straight down on the solar system, not looking straight on from the side, etc.) on the action.
Join Vimeo. Join the class group at Vimeo: http://vimeo.com/groups/lcc2730. Upload your playblast video to Vimeo and share it to the class group. So I can find it, name the video: LastName_FirstNameInitial_Project_1 (for example "Smith_J_Project_1").
Why?
This is a good beginner project to help you get familiar with the Maya interface and animation workflow.
Resources:
Chapter Two (pages 31-68) of Introducing Maya 2011 outlines everything you need to know to complete this project (except how to upload and add the video to a group in Vimeo). For more tutorials:
Project #2: Bouncing Ball What?
Animate a bouncing rubber ball in Maya. The ball must roll off of a tabletop and bounce on the floor until it comes to a natural-looking rest. Use the principles of animation discussed in class, especially squash and stretch. It is your choice if you want it to look super cartoony or pretty realistic, or something in between. The animation should be anywhere between 3-6 seconds. You must change and really work with your animation curve tangents to get a good bounce (this is covered in the required reading, but there is also this tutorial explaining it). Do not forget to add breakdown keys to control the look of the ball going into and coming out of the impact, as well as in other places in the timeline.
When finished with your Bouncing Ball animation, render a playblast. You should leave a second of dead time at the end of the playblast allowing the fact that the ball has indeed come to rest soak in for the viewer (an important concept of moving imagery is ensuring that you give your audience time to read and process the movement).
Upload your playblast video to Vimeo and share it to the class group. Remember to name the video: LastName_FirstNameInitial_Project_2 (for example "Smith_J_Project_2").
Why? A ball bounce is a perfect exercise to put basic animation principles into practice: squash and stretch, ease-in and ease-out, as well as using keyframes and breakdown keys appropriately. This will also help you incrementally become more familiar with Maya by building off of the experience you gained in the previous project.
Resources:
Ball Bounce Reference Videos - study these videos. See and feel the squash and stretch. Note the dramatic differences of the "hang" in the air among the different balls. Notice how they always rolls around a little bit before coming to a rest, how some jiggle into place. Incorporating and artfully exaggerating these details make for the most compelling and interesting animations. Even surreal or cartoony animations are based in real world physics (albeit very creative and selective reinterpretations of real world physics).
The first part of Chapter Eight (pages 373-384) of Introducing Maya 2011 outlines how to technically complete the project in Maya. But for more information and help on the art and craft of the ball bounce, see The Animator's Survival Kit (pages 35-67). In terms of workflow, first block out your main animation keyframes. Adjust your animation curves. Then add breakdown keys.
Project #3: Anticipation and Contrasting Motion What?
Animate two bouncing balls: a bowling ball and a water balloon. Each ball must move off (it doesn't have to roll off) of a higher position (doesn't have to be a table) and bounce on the ground until coming to a natural-looking rest. Use the principles of animation discussed in class and covered in the readings. It is your choice if you want your animation to look super cartoony or pretty realistic, or something in between. Regardless of the animation style you choose to use, each ball should express its weight and material very clearly to the viewer (the water balloon should look like a water balloon, probably squashing and perhaps jiggling a lot, the bowling ball squashing much less, but having much more exaggerated impact, etc.).
YOU MUST SHOW ANTICIPATION AT LEAST TWO TIMES somewhere in the animation. You could show anticipation on both balls once, or on once ball twice. The most obvious place to show anticipation is before the ball falls off of the table. Perhaps the water balloon really squats down before "jumping" off, or perhaps it backs up to get a running start before the jump, or maybe it is scared and shivers in fear before being pushed off by the big bad bowling ball. Be creative in how you integrate anticipation in this animation.
You should continually refer back to the real-world source videos below as you animate, because this will dramatically improve the quality of your work. It will keep giving you many ideas and inspiration. The animation should be anywhere between 3-8 seconds.
When finished with your Contrasting Motion animation, render a playblast. Upload your playblast video to Vimeo and share it to the class group. Remember to name the video: LastName_FirstNameInitial_Project_3 (for example "Smith_J_Project_3").
Why? This project allows you to further exercise and apply animation principles, building off of your bouncing ball experience and adding another layer of complexity in the anticipation requirement as well as the contrasting ways each ball will move and react to its impact with the ground.
What?
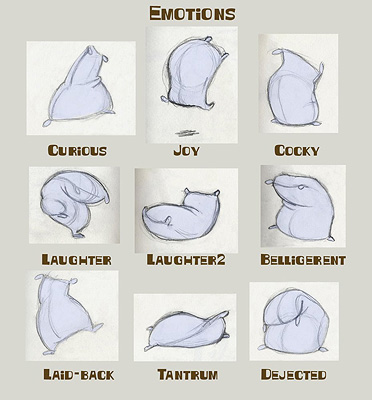
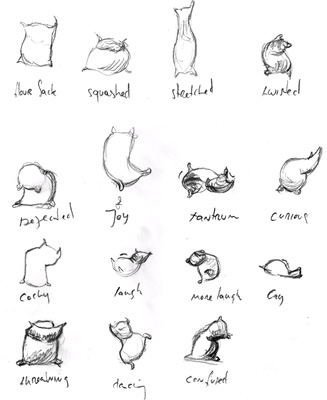
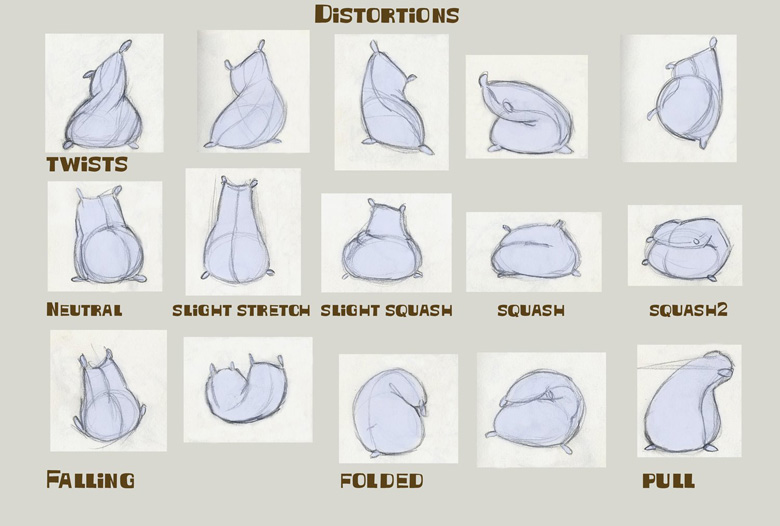
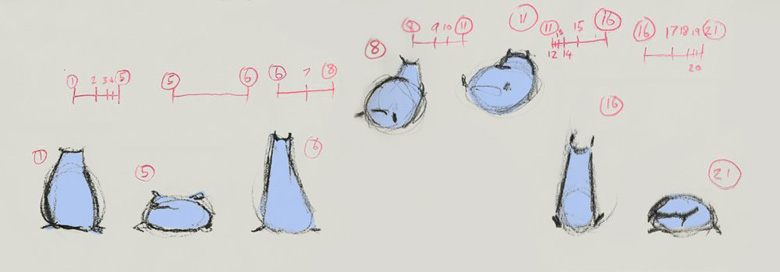
Animate a floursack very obviously changing from one emotional/conscious state to another. Some potential ideas: sleepy then shocked, confused then disgusted, mad then enamored. Focus on hitting really expressive poses so the emotions/conscious state of the floursack is extremely expressive and clear to see. Use artful breakdown frames as described in Reading #6 from the Animator's Survival Kit (pages 217-255). Also refer to Reading #7 about acting (pages 315-326). These readings will really help you compose high quality work. Layer gross and fine movements that are complementary and contradictory to achieve complex expressions. If you don't know where to start, consider using the concept of "body centers" to establish leads of movement (neurotics lead with their head, heroes lead with their chest, and libidinal people lead with their hips). Is your floursack bold and courageous? Then it might lead its movement with its chest. Or, is it paranoid and timid? Then it might lead with its head, perhaps tucking it into its shoulders.
The duration of the animation should be between 5-10 seconds.
Upload your playblast video to Vimeo and share it to the class group. Remember to name the video: LastName_FirstNameInitial_Project_4 (for example "Smith_J_Project_4").
Why? An anthropomorphic object conveying emotions delivers the best of both worlds in terms of animation. You don't have the complexity of moving a human body, but you have all of the emotional variety human beings are capable of feeling and expressing at your disposal. A floursack is surprisingly versatile in expressing human emotions if you are willing to be a little creative and experimental.
What?
Animate a character lifting up or pushing a very heavy object of your choosing. For the heavy object you may use anything: a huge ball or cube, or perhaps something you downloaded, such as a car model, etc. The character should be able to lift or push the object, but the strain should be very obvious and palpable. It can be realistic or cartoony in its animation style, but regardless make the animation clear to read, appealing and attention-grabbing.
The duration of the animation should be between 5-10 seconds. Do not go over 10 seconds. Short awesome projects are better than longer mediocre projects.
Upload your playblast video to Vimeo and share it to the class group. Remember to name the video: LastName_FirstNameInitial_Project_5 (for example "Smith_J_Project_5").
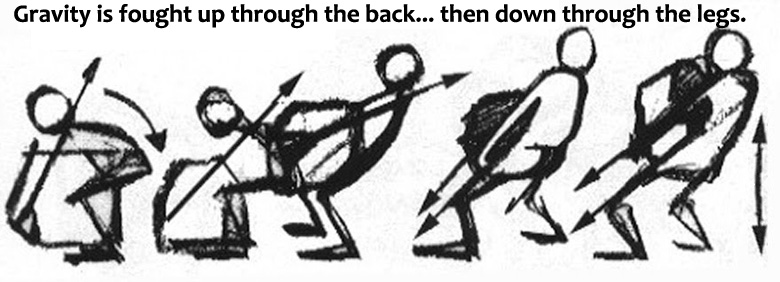
Why? Conveying weight is one of the core components of animation, and one of the most difficult to do well. All animation, even that which is not explicitly about fighting gravity, will still greatly benefit from making objects and bodies seem to be constantly affected, pulled, and pushed around by gravity. For example, think back to Project #4, didn't the ones that appealed to you most evoke a clear sense of presence and gravity in the floursack as it moved (although that wasn't the explicit objective of the assignment)? Bodies affected by gravity seize our imagination, we believe they are "in the world" and we feel their presence more deeply as we watch them move.
Resources: Refer to required Reading #8, from the Animator's Survival Kit,
pages 256-272. Refer to the relevant videos in our Vimeo forum thread on reference videos. NOTE: When using these reference videos understand that some of these guys are super strong and make heavy weights look light. Those videos will be bad for you to use because they are deceiving. Only use reference videos that clearly express the "fight" between the human and gravity. If you find more reference videos please add them to the forum thread in our Vimeo group.
Although there are many, many good reference videos about lifting and pushing heavy objects online, you need to PHYSICALLY PERFORM YOUR ANIMATION YOURSELF to fully understand and intuitively feel the timing and poses from "inside" the action. Do this before you start animating and do it as you are animating. This takes all of two minutes to do. Take the time to do this, it will actually speed up your workflow and improve the quality of your pieces.
Here are some animated examples:
Project #6:
Choose to do either 6A or 6B.
Project #6B: Walk Cycle Loop
What?
Animate a human walk cycle that clearly expresses an emotion (an exhilarated walk, a depressed walk, a sexy runway walk, etc.). This is a difficult project. Key advice: start early and work consistently throughout the time allotted. Use the source material and techniques covered in class to make it a very expressive animation. Use the model provided in the Understanding Maya 2011 CD called "block_man_v02.mb" from the Block_Man project folder. The animation should be around 1-3 seconds.
Upload your playblast video to Vimeo and share it to the class group. Remember to name the video: LastName_FirstNameInitial_Project_7 (for example "Smith_J_Project_6").
Why? If you can animate a walk cycle well you can animate anything. It is widely regarded as the most important animation to be able to execute well because it incorporates so many important concepts. This project is a culmination of all the lessons you have learned up to this point in the class.
Resources: The first part of Chapter Nine in Introducing Maya 2011 (pages 417-431) will help you block out a basic cycle. Remember to go far beyond the "generic" walk cycle covered in the book, however. You will have to dramatically modify it, such as exaggerating (or suppressing) the arm swing, the tilt of the head, the side-to-side of the hips, the length of the gait, etc., to evoke the emotion and attitude you are going for.
How to repeat keyframes into infinity so the playblast can run through the animation several times and the video can be longer.
What? This project allows you to experiment beyond what has been covered in class. You may create a 3D model, create and render some special effects, or whatever you wish to do. It does have to be done in Maya and it will be critiqued using whatever criteria is appropriate for your project. It would be wise to use this project as a precursor to the final project. Try to use it to test out some ideas and create content that can be integrated into your final project.
If you will be modeling for this project, the tutorials that comprise chapters 5 and 6 of the Intro to Maya 2011 book will be helpful to you. Perhaps you want to concentrate on texturing objects, in which case chapter 7 will be helpful. If you want to work with lighting, refer to chapter 10, and for dynamics and special effects, refer to chapter 12. Of course, many tutorials online will be immensely helpful to you as well, such as the tutorial database at http://www.creativecrash.com/tutorials.
NOTE: if you are going to work with any of these: texturing, lighting, dynamics, or special effects, you will need to learn about rendering in order to best showcase your effort. Tutorials on rendering can be found in chapter 11 in the Intro to Maya book.
If 6B involves rendered video, upload it to Vimeo and share it to the class group. Remember to name the video: LastName_FirstNameInitial_Project_7 (for example "Smith_J_Project_7").
If 6B is not time-based work, but is instead models and textures for example, have some good renders and imagery to show the class on critique day. Also, email me all of the resources that you have created and used for this project.
Why? This gives you an opportunity to have even more control over your final project and begin incorporating other affordances of moving imagery beyond animation, such as lighting, modeling, etc., in your creative arsenal.
Project #7: Freestyle Pitch and Plan
What?
Produce a pitch and plan for your Final Project #8 that you will present to the class. This should be a professional presentation, so use Power Point, or other appropriate software to make it look polished. Your presentation should be around one minute.
The nature of the final project that you are pitching is entirely up to you. You may use Maya, Flash, or any moving image software to produce it. Use this opportunity to really showcase your new animation skills in a way that is personally meaningful to you. If you could animate anything, what would it be? Why? You could take an audio clip from a politician's speech and animate an animal (a rig you would download, probably) lip syncing and facially animating to the speech. You could produce a short crazy fight scene. Or, an experimental or avant-garde work, etc.
Group projects must be approved by the teacher. Group animation projects generally require more work from each participant, not less, so do not do it in order to hide behind the effort of others, you will get a worse grade if that is the case.
It is key to set an appropriate scope for this project. Plan to keep your final video less than 20 seconds (even less is better) so every single frame of it radiates with quality work.
Why? This is the most important project in the course and you have a lot of control over how it will be executed. We increasingly live in a media environment that consists of moving images created by people rather than media corporations. Being able to produce quality moving imagery that powerfully conveys what you want it to convey is an increasingly important skill to have. You might consider using this piece in your online portfolio (which you all should have) as a way to round out your presentation of skills and interests. For example, even if you want to be a web developer, game programmer, etc., having an embedded video in your online portfolio showing off your animation skills will make you seem more dynamic and attractive to future employers or clients.
Resources: You may do some modeling, lighting, texturing, and rendering for this project. There are excellent tutorials covering these topics in your Introducing Maya 2011 book. Here are some more good ones:
What?
The goal and nature of this final project was pitched by you in Project #7. Based on the feedback from your pitch and plan of Project #7, execute your final project for the course. It is up to you to get continuous feedback on this final project and integrate it into your work process. The feedback should be visible in your final animation. You will be graded according to this breakdown:
1/3 of Grade: How well you executed your plan.
1/3 of Grade: How well you animated your final project.
1/3 of Grade: How well you addressed or incorporated criticism.
Key advice: start early and work consistently throughout the time allotted.
Upload your playblast video to Vimeo and share it to the class group. Remember to name the video: LastName_FirstNameInitial_Project_10 (for example "Smith_J_Project_8").
Why? This is the most important project in the course and you have a lot of control over how it will be executed. We increasingly live in a media environment that consists of moving images created by people rather than media corporations. Being able to produce quality moving imagery that powerfully conveys what you want it to convey is an increasingly important skill to have. You might consider using this piece in your online portfolio (which you all should have) as a way to round out your presentation of skills and interests. For example, even if you want to be a web developer, game programmer, etc., having an embedded video in your online portfolio showing off your animation skills will make you seem more dynamic and attractive to future employers or clients.
Resources: You may do some modeling, lighting, texturing, and rendering for this project, but remember that the primary component on which you will be graded is the work as moving imagery (not still models, not beautiful renders of a scene, etc.). There are excellent tutorials covering these topics in your Introducing Maya 2011 book. Here are some more good ones: